Hiring a real estate photographer may be out of the question for many agents on a tight budget. But you can still be successful with real estate photography without the aid of a professional — you simply need to master two main real estate photography topics to head in the right direction:
- How to set the scene for listing shoots
- Using your camera to get the best photos
Keep reading to discover more about these vital preparation tips for real estate photography before snapping away at your listings, along with instructions for how to use the three most popular camera types agents typically use — smartphone, digital point-and-shoot, and digital SLR.
Factors to Consider Before Shooting Real Estate Photos
Look at the photos you see posted on Facebook and Instagram and you’ll likely notice many of your friends, family, and colleagues consider themselves gifted photographers. What’s important to realize, though, is that there’s a big difference between snapping a pic of brunch and taking carefully crafted real estate photos of your listings. Unlike candid shots, listing photos require preparation to produce good results. There are several factors you need to take into account regarding photography for real estate before you even pick up your camera.
Staging
You can’t control every aspect of staging when taking real estate photos. For instance, you may not have the money to hire a staging services company that can provide stylish decorative accents — meaning you have to make due with your clients’ knick knacks. However, there are still ways to make a home look appealing. All it takes is a little creativity.
When it comes to furniture, for example, highlight the most attractive pieces in your client’s home. Set the good china out on the dining room table to make the room seem perfect for family meals. Similarly, organize the couches and chairs in the living room to make the space warm and inviting. Most importantly, keep clutter to a minimum.
In short, identify specific ways you can make every room camera-friendly without having to supply lots of temporary decor or furniture to spruce things up. Remember your ultimate endgame: to impress buyers and make them imagine their own belongings throughout the home.
Discover more staging tips and tricks that can help you shoot winning real estate photos:
- Staging a Home for Sale (A Real Estate Photographer’s Point of View) — Tips for Real Estate Photography
- Staging on a Budget — Realtor Magazine
- 30 Can’t-Miss Home Staging Tips — HGTV
Composition
Composition refers to how elements of a photo are organized. Successful real estate listing photos not only capture one or more distinct property features, but focus on the right aspects of the features. For instance, if you took a photo of the bathroom, you wouldn’t focus the camera on the tile floor. Rather, you’d focus on getting the shower and tub or the vanity and cabinetry in a single shot.
Also, determine what kind of angles you want. Simple, straightforward shots might not entice real estate website visitors, so come up with unique ways in which you can display your listings and their features. Get creative: Use a ladder to take a shot spanning an entire floor, go to the second floor to take shots of the first floor, or even shoot the interior from outside (and vice versa). In other words, think outside the box to get prospective buyers inside the home (see what I did there?).
Get many more insights into real estate photo composition by reading these expert posts:
- What is Composition in Photography? — Photography Life
- 10 rules of photo composition (and why they work) — Digital Camera World
- Basic Photography Composition Tips for New Photographers — FilterGrade
Lighting
Another aspect to keep an eye on during your real estate photography shoot is lighting. Poor lighting can ruin your session, so either make sure there is plenty of natural light flowing through a home or that there are enough lights on to highlight every corner of a listing.
Often the problem is a sharp contrast between the natural light coming in through windows and the artificial lighting inside, which is typically much more dim. Adding additional light is difficult, so consider waiting until dusk when the outdoor light is reduced, pull down shears, or partially close shades to balance the interior and exterior light.
Take a peek at these posts on lighting, which are real estate photography tutorials that can help:
- The Top 10 Photography Lighting Facts You Should Know — Popular Photography
- Are You Practicing these 5 Natural Lighting Tips? — Digital Photography School
Thoroughness
This isn’t so much a technical component required to successfully shoot your listings, but it’s a characteristic you’ll need to get the photos you want. Ask any professional photographer and they’ll tell you it takes a hundred shots (or more, sometimes) to get even one great photo. Moreover, it’s best to take photos of every facet of your listings with different lighting and composition to get variety with your shots. Each real estate photo you take should have its own unique feel to it. Stagnant shots of your homes for sale won’t make your properties stand out.
Dedicate plenty of time during your shoots to ensure you end up with several usable, attractive images for your real estate website and other marketing materials. Sure, you can edit them (to a small degree) after the fact, but your best bet is to aim for high-quality photos that don’t need any touch-ups.


Popular Cameras Used for Real Estate Listing Photos
Now that you’ve had a primer in how to take photos of your listings, it’s time to decide which camera you’ll use to capture those images. There are three main devices you can use — each of which offers different learning curves and benefits.
Smartphones
Probably every agent has used their iPhone, Android, or other smartphone to capture real estate listing photos — and it’s easy to understand why.
Smartphone technology has come a long way in the past handful of years, particularly when it comes to cameras. Case in point: Look at this post from Camera+ and MagiCam co-founder Lisa Bettany that shows how much better and clearer iPhone photos have gotten from the first iPhone all the way to iPhone 6. It’s evident that some smartphones can meet the match of many digital cameras on the market.
The first thing to start with when shooting real estate listing photos with an iPhone is learning what photography capabilities your phone has in terms of both shooting and editing. Some of the most popular features of your iPhone’s camera include:
- The ability to zoom in and out: No more are the days of having to literally walk in different directions to get the right composition for your photos. Now, all you have to do is zoom in. Just be sure to hold your finger on your iPhone for a few seconds where you want the focus to be, as this will auto-adjust it for you (this takes some playing around with to get the right lighting).
- Several great editing tools: With the latest iOS updates for your iPhone, you can adjust various aspects of your photos to make them look even better, including the exposure, shadows, brightness, contrast, and color. Even if you don’t get the right zoom the first time around, you can crop your photos after the fact. The key is not altering the photos enough so that they misrepresent your real estate listings.
- High dynamic range (HDR): The relatively new HDR capabilities of the latest iPhones mean you don’t have to alter your photos’ lighting on your own in many cases. Instead, with HDR on, your iPhone automatically captures a better balanced exposure across your entire image. Of course, you can still edit these shots as well, but more often than not, you won’t need to.
- A photo grid to map your shots: Ever take a picture and realize it’s not nearly as centered as you originally thought it was? Avoid this issue altogether by implementing the grid feature for iPhones, which gives you a 3×3 grid that helps users optimize their photos accordingly.
There are countless other great real estate photography tricks and tools that can turn you into a savvy smartphone photographer, but these are the main ones that can get you started off on the right foot when shooting real estate listing photos.
Use these in-depth resources to further your iPhone photography education:
- Ten rules for great iPhone photography — Macworld
- 10 Simple Tips for Better iPhone Photography — iStabilizer
Digital Point-and-Shoot
Another good option to capture great photos for real estate (particularly if you’re just learning how to shoot real estate photography) is using a digital point-and-shoot camera.
These were the go-to cameras before smartphones and tablets overtook their popularity in the mid-2000s, but many agents — particularly those who may not be comfortable using smartphone cameras — continue to use the devices as their main real estate photography gadgets.
For some, they may not be as convenient as using a phone to snap property pics, but they still have numerous pros. For instance, point-and-shoot cameras:
- Are often easier to use than smartphones and DSLRs: The biggest benefit to using a point-and-shoot camera is its simplicity. There aren’t tons of buttons and functions to toy around with. Rather, you simply zoom in and out as needed, frame your shot, and snap away.
- Allow for different flash adjustments: Getting too much glare when using flash? Most point-and-shoots come with the ability to reduce flash strength, meaning you can alter your shots based on various lighting situations.
- Offer users the ability to take rapid-fire shots: Just like smartphones and DSLRs, you can take very quick shots in succession, meaning you get lots of options for your beautiful real estate listing photos.
You’re more likely to get better real estate listing shots by using an iPhone or a DSLR, but the ease of use of point-and-shoots can’t be argued.
Discover the best point-and-shoot cameras on the market and how to use them by reading these posts:
- How To: Take Great Photos With Your Point and Shoot — Digital Camera Review
- 10 Tips for When a Point and Shoot is Your Only Camera — I Heart Faces
Digital SLR
For the more intricate and experienced real estate agent-turned-photographer, there are DSLR (or digital single lens reflex) cameras, which come with quite a bit more functionality than point-and-shoots and the ability to take more detailed shots than many smartphones (though experts continue to contrast and compare the two cameras to determine best quality and value).
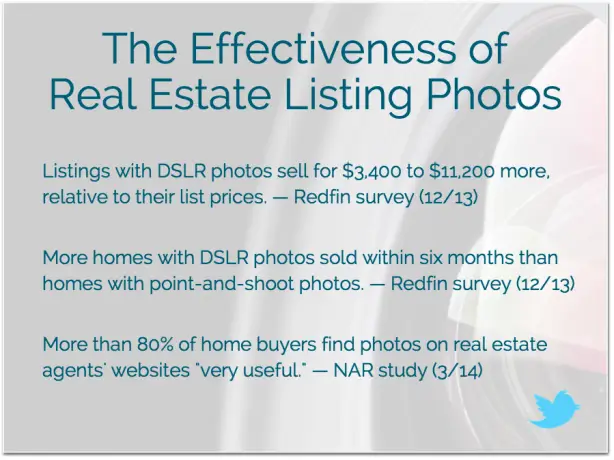
What sets DSLRs apart is that they offer more features, allowing seemingly innumerable types of photos to be taken, and DSLRs can have different lenses attached to them, each of which offers a different perspective while shooting.
Other notable differences that separate DSLRs from other camera types include:
- Their array of manual controls: There are quite a few ways you can alter your shots using a DSLR, including everything from shutter speed and lighting softness to flash strength and filters. If you’re not an expert with this camera type, each feature can take some time to become familiar with. Having said that, once you master DSLRs, you can capture your photos in very unique fashions.
- Image quality is exceptional: Your new iPhone or Android may have sharp image quality, but with certain DSLR cameras, it’s even better. Thanks to the significant image sensor size in most DSLRs, they can take shots at a lower ISO which leads to far clearer images than even the latest smartphone.
- Low light isn’t an issue at all: Setting up additional lighting during your real estate photography shoots helps, but thankfully, it’s not always necessary to have it when shooting with a DSLR. Again, this is due to the ISO, which means the digital capture of the camera can more capably capture light even when there’s very little.
Given the many pros of using a DSLR compared to smartphones and point-and-shoots, they tend to be much higher-priced than the other cameras. Digital SLRs typically run anywhere from a few hundred dollars to a five-digit price tag — and that’s excluding the add-ons like lenses and flashes. However, it’s the clear-cut choice for agents who consider themselves more experienced and educated with photography for real estate.
These DSLR articles offer up some handy advice on how to use the cameras and enhance the shooting experience:
- Should you buy a DSLR or Point and Shoot Digital Camera? — Digital Photography School


